How to get your Raspberry PI to log it’s assigned IP Address to a Google Sheet every time it boots up!
Headless Raspberry PIs are a brilliant way to expand your computing empire, while still living in a predominantly Chrome OS world. Whether you choose to run a media server, a FLAC encoding system or an IOT automation project, you will be able to easily connect into your PI from the comfort of your Chromebook/box/bit using a simple SSH Client.
So far, so good. But, without a screen attached to your lovely little Linux-based PI, how do you know what IP address to connect to?
Shortcuts
If you’re in a hurry or just a little impatient, you can skip over the majority of the explanation in this article. Just make a copy of the spreadsheet (above) and jump to the Configuration section below to get up and running.
Automatic Connectivity
There are a plethora of excellent guides to help you get your PI to automatically connect to a wireless network. The configuration used for this system is below as an example. As this PI is regularly used in different locations, it uses a WPA Supplicant file to allow multiple configurations (Wireless Networks) to be specified. It then connects to the first one that it finds.
Alternatively, you could assign a static IP address to your device, but this is a pain if you need to connect to multiple networks or operate in an environment where you don’t have full control of the IP Addressing Space (e.g. at work). You can also use a dynamic DNS registration service, but this will only give you the external IP address (e.g. Internet faced) of your device, which isn’t much use if you need to connect to it locally. Finally, reserved IP addresses in DHCP could be used, but again, this requires having full access to the network and means extra work to maintain and document! Dynamically assigned DHCP addresses are accessible and convenient, and this post documents an easy way to log them every time your PIs boot up, regardless of where they are in the world!
Interface Config
Raspbian Stretch
On later versions of Raspbian/Debian (beginning with stretch) network configuration and hooking up the wpa configuration is handled automatically by dhcpd. You can, therefore, skip straight to wireless configuration below. In fact, if you end up configuring the interfaces in /etc/network/interfaces as well it can have seemingly unpredictable results, so steer well clear! On a home network, you may wish to speed up the address assignment process by disabling ARP probing.
To do this, type the following:
sudo nano /etc/dhcpcd.confAnd add the following line:
noarpIf you are using a different type of OS/board, e.g. an Asus TinkerBoard running Tinker OS (stretch) then you may find that the WPA configuration is not handled by default by dhcpd. In this case you may need to create you own DHCP hook to handle this.
To do this, type the following:
sudo touch /lib/dhcpcd/dhcpcd-hooks/10-wpa_supplicant
sudo nano /lib/dhcpcd/dhcpcd-hooks/10-wpa_supplicant
Then copy and paste in the script from the Raspberry Pi repository.
Raspbian Jesse
If you are using earlier versions then the /etc/network/interfaces file contains the overall network interface configuration, and in turn, this points to the wpa supplicant configuration file to define the wireless networks that the PI will connect to.
To edit this file, type the following:
sudo nano /etc/network/interfacesThen the actual contents of the file could be something similar to below (although feel free to use your config, as this is just an illustrative example).
source-directory /etc/network/interfaces.d

auto lo
iface lo inet loopback

auto eth0
iface eth0 inet dhcp

allow-hotplug wlan0
auto wlan0
iface wlan0 inet dhcp
    wpa-conf /etc/wpa_supplicant/wpa_supplicant.conf

auto wlan1
allow-hotplug wlan1
iface wlan1 inet dhcp
    wpa-conf /etc/wpa_supplicant/wpa_supplicant.conf
Wireless Config
The /etc/wpa_supplicant/wpa_supplicant.conf file will contain a network definition for each wireless network that you would like your PI to be able to connect to (your home network, work network, coffee shop network etc.)
sudo nano /etc/wpa_supplicant/wpa_supplicant.confcountry=GB
ctrl_interface=DIR=/var/run/wpa_supplicant GROUP=netdev
update_config=1
network={
ssid="HOME WIRELESS SSID / NAME HERE"
psk="NETWORK KEY HERE"
proto=RSN
key_mgmt=WPA-PSK
pairwise=CCMP TKIP
group=CCMP TKIP
}
network={
ssid="WORK WIRELESS SSID / NAME HERE"
psk="NETWORK KEY HERE"
proto=RSN
key_mgmt=WPA-PSK
pairwise=CCMP TKIP
group=CCMP TKIP
}
network={
ssid="OTHER WIRELESS SSID / NAME HERE"
psk="NETWORK KEY HERE"
proto=RSN WPA
key_mgmt=WPA-PSK
pairwise=CCMP TKIP
group=CCMP TKIP
}Spreadsheet Format
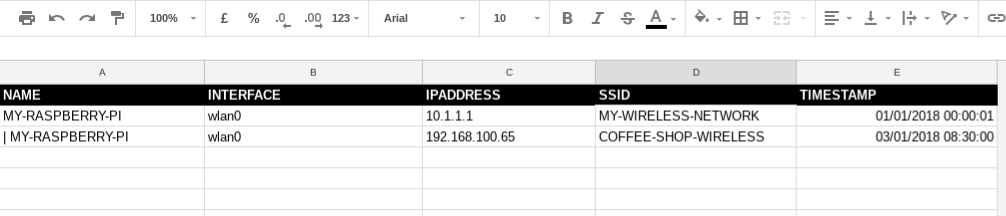
The spreadsheet linked above contains an IP Addresses address tab where the following details will be recorded. The aim is to have a new row appended each time the Raspberry PI boots up, recording it’s IP address and which wireless network was connected to. An example of the data format we’re looking for is below.
| NAME | INTERFACE | IPADDRESS | SSID | TIMESTAMP |
|---|---|---|---|---|
| MY-RASPBERRY-PI | wlan0 | 10.1.1.1 | MY-WIRELESS-NETWORK | 01/01/2018 00:00:01 |
| MY-RASPBERRY-PI | wlan0 | 192.168.100.65 | COFFEE-SHOP-WIRELESS | 03/01/2018 08:30:00 |
Spreadsheet Script
The key to this process is running a very basic web app from the spreadsheet itself, using Google App Script. This web app will accept web requests (HTTP GET requests) from your Raspberry PI, containing some parameters in the query string part of the URL (the bit after the ?). The code is shown below (and also included in the example spreadsheet above).
function doGet(e){
  return handleResponse(e);
}

function doPost(e){
  return handleResponse(e);
}

function handleResponse(e) {

  try {

    var _id = "{{ YOUR SPREADSHEET ID HERE }}";
    var _sheet = SpreadsheetApp.openById(_id).getSheetByName("IP Addresses") || SpreadsheetApp.openById(_id).getSheets()[0];
    var _headers = _sheet.getRange(1, 1, 1, _sheet.getLastColumn()).getValues()[0];
    var _values = [];

    for (i in _headers){

      if (_headers[i] == "TIMESTAMP"){

        _values.push(new Date());

      } else {

        if (e.parameter[_headers[i]]) {
          _values.push(e.parameter[_headers[i]]);
        } else if (e.parameter[_headers[i].toLowerCase()]) {
          _values.push(e.parameter[_headers[i].toLowerCase()]);
        } else if (e.parameter[_headers[i].toUpperCase()]) {
          _values.push(e.parameter[_headers[i].toUpperCase()]);
        } else {
          _values.push("");
        }

      }

    }

    _sheet.appendRow(_values);

    return ContentService
          .createTextOutput(JSON.stringify({"result":"success"}))
          .setMimeType(ContentService.MimeType.JSON);

  } catch(e){

    return ContentService
          .createTextOutput(JSON.stringify({"result":"error", "error": e}))
          .setMimeType(ContentService.MimeType.JSON);

  }

}
The web app itself is very straightforward. It grabs the various parameters from the query string and matches them to the column headers in the target spreadsheet. You need to put the ID of your spreadsheet in place of the {{ YOUR SPREADSHEET ID HERE }} placeholder in the code. You can get the ID of your spreadsheet from it’s URL - it’s the part between the ‘/d/’ and the ‘/edit’ and should be a long set of letters/numbers, often with hyphens between groups of them.
Configuration
To configure the process, you need to first set up the sheets script as a web app and get the web app URL so you can configure the PI to talk to it. You can use the same sheet for as many Raspberry PIs as you would like, you just need to supply a unique name for the Raspberry PI in each case to make identifying them easier!
Google Sheet
In the sheet script editor (Tools -> Script Editor), you need to publish the script as a web app. To do this, click ‘Deploy as web app…’ from the Publish menu. Select new version, execute the app as yourself and set the app access to anyone, even anonymous. This will allow the PI to connect to the app without supplying credentials, and it will also allow the web app to write to your spreadsheet, without having to change the access rights on the sheet itself. You will need to go through the standard ‘OAuth’ permission process when you publish, and it will ask you to grant the script permission to access your spreadsheets (as it will be running without you being logged on).
Once you have completed this process, you will be able to access your web app URL. This should start with https://script.google.com/ and include a long (unguessable) set of characters. Copy this URL and test it by pasting it into a new browser tab (incognito is best here, as that will test that you don’t need to be logged on to access the script). You should get a success message back, and a new row will appear in your spreadsheet, with no data apart from a timestamp. You can safely delete this row once you’ve tested the app.
If you are having problems, verify that you have got the correct spreadsheet ID in the script, and make sure you have published it in the way detailed above.
Raspberry PI
Now, just the Raspberry PI needs configuring. We need to PI to run a small script (to make a connection to the web app) once it has connected to a wireless network, and received an IP address. To do this, we are going to use dhcpcd-run-hooks.
To create a new hook, use the commands below.
sudo touch /lib/dhcpcd/dhcpcd-hooks/99-google
sudo nano /lib/dhcpcd/dhcpcd-hooks/99-google
The script for this hook should be as follows:
if $if_up; then
    url="{{ YOUR WEB APP URL HERE }}?name={{ YOUR RASPBERRY PI NAME HERE }}&interface=$interface&ipaddress=$new_ip_address&ssid=$ifssid"
    wget --retry-connrefused --tries=5 --output-document=- --background --no-cache --quiet "$url"
fi
You need to replace the {{ YOUR WEB APP URL HERE }} placeholder with your web app url from the previous stage, and also supply the name of your Raspberry PI, replacing the {{ YOUR RASPBERRY PI NAME HERE }} placeholder. You can’t use the $HOSTNAME variable here, as dhcpcd-run-hooks will strip almost all environmental variables when it runs, so you need to supply a literal string here. This value will be recorded in your spreadsheet, so use a name that you would recognise (like ‘Media-Server’). If you want to use spaces or special characters here, you will need to encode them using escape characters (e.g. replace a space with %20).
Finally
Once your Raspberry PI is configured, you can restart it (sudo reboot), and the IP Address it is assigned will amazingly appear as a new row in your spreadsheet. You can then SSH directly into it without needing a monitor, keyboard or any of the other normal paraphernalia. If you are managing a small fleet of Raspberry PIs (e.g. for display screens), this is an incredibly useful way to keep track of them all!
Tagged ► Network, Coding, Javascript
Related ► Google Calendars on the Web (01 Sep 2018), Protecting Data with Google Drive (14 Aug 2018), Dealing with confidential information in schools (24 Jul 2018)